sey gif top


Part 2
Showing posts with label Blogger News. Show all posts

Saturday, 22 December 2012

Top 20 Best Free Blogger Templates

20 Best Free Blogger Gallery Templates

Blogger is one of the popular blogging platform on Internet.If you want to start a website/blog without any money investment, then Blogger should be your first choice.Since Blogger is a product of the internet giant Google, you don't need to worry about your website uptime or any other technical stuffs behind your website.Also, to add beauty to your Blogger blog, there is plenty of awesome blogger templates and themes which you can download and use for free on your blog.

Check out this beautiful gallery blogger templates....

20 Best Free Blogger Gallery Templates


Top 20 free blogger gallery templates selected, ranked from most awesome to awesome....

Pinfinity


Pinterest Blogger Template download free

Pinfinity is a beautiful pinterest look-a-like blogger template by soretemplates. It's main features include dynamic grid layout, social links and drop-down navigation menu.

[ Demo ] [ Download ] [ More Info ]

Galauness


Galauness Blogger Gallery Template Download Free

Galauness is a clan, minimalist wordpress look blogger template by iksandi.com.It's main features include neat typography, custom 404 page, social link buttons, flickr photo widget, related posts and template designer ready.

[ Demo ] [ Download ] [ More Info ]

Vasiliki


Vasiliki is a responsive blogger template by besttheme.net.It's main features are dynamic grid layout, auto read more and auto thumbnail.

[ Demo ] [ Download ] [ More Info ]

Portfolio


Portfolio free gallery blogger template free

Portfolio is a beautiful gallery blogger template by bloggerzbible.It features include beautiful layout, auto thumbnail for posts and simple menu navigation.

[ Demo ] [ Download ] [ More Info ]

Pegasus


Free Blogger Gallery Template Download Pegasus

pegasus is another beautiful gallery template by soratemplates.It's features are 4-column gallery layout, drop down navigation menu and pagination widget.

[ Demo ] [ Download ] [ More Info ]

Simplex Portfolio


Free gallery blogger template simplex portfolio

Simplex Portfolio is a portfolio template by simplex design with gallery area to showcase photos.It also has a blog posts area to show latest posts.Other features of this template are related posts widget.

[ Demo ] [ Download ] [ More Info ]
Simplex Focus


Free Blogger Gallery Template Download Simplex Focus

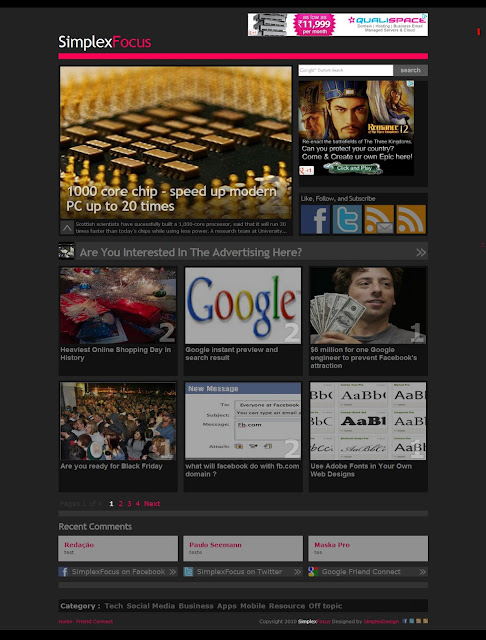
Simplex Focus is a nice, dark colored theme by simplex design.It has nice and unique layout and a pagination widget.
[ Demo ] [ Download ] [ More Info ]

X10 Masonry Transparent


x10 masonary blogger gallery template download

X10 Masonry is unique styled transparent template by urang kurai.It main features are dynamic grid layout and custom background images.

[ Demo ] [ Download ] [ More Info ]

Youblog


Youblog free blogger gallery template download

Youblog is a video gallery blogger template by bloggerzbible.It features are features posts slider and auto video thumbnail.

[ Demo ] [ Download ] [ More Info ]
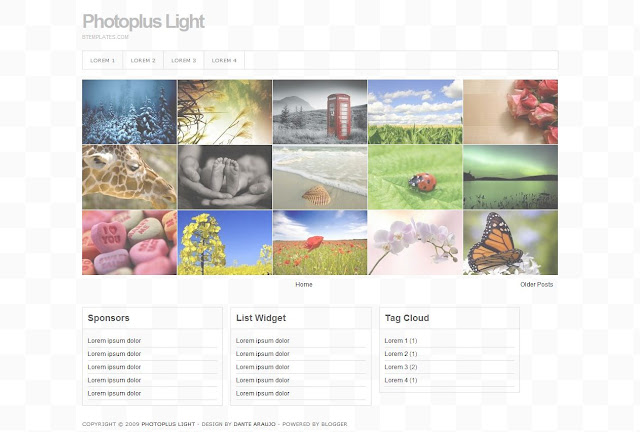
Photo Plus light


Photoplus Light free blogger gallery template download

Photoplus Light is a light colored beautiful gallery template by dantearaujo.This template is perfect for photography and gallery blogs.

[ Demo ] [ Download ] [ More Info ]
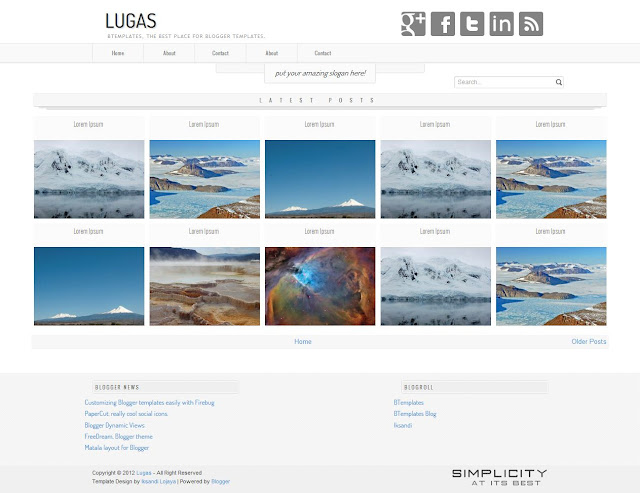
Lugas


Lugas free download blogger gallery template

Lugas is a gallery blogger template by iksandi.This template has 4 column gallery layout and comes with social buttons.

[ Demo ] [ Download ] [ More Info ]

Photo Gallery Dark


free blogger gallery template photo gallery dark

Photo Gallery Dark is a dark gallery style blogger template by bloggermint.This template has 4 column gallery layout and pagination widget.

[ Demo ] [ Download ] [ More Info ]

Box Office


free blogger gallery template box office

Box Office is a unique blogger template by besttheme.This template is suitable for review blogs such as movies, softwares, books etc.It has a rating bar where post authors can rate.

[ Demo ] [ Download ] [ More Info ]


Jhony Bingung
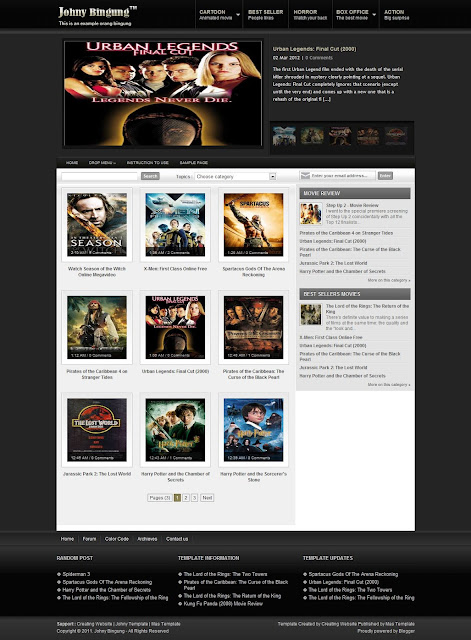

jhonny bingung free blogger gallery template download

Johny Bingung is a gallery style blogger template by mas template.This template is most suited for movie blogs.It has 3 column gallery template and pagination widget.

[ Demo ] [ Download ] [ More Info ]

White Magic
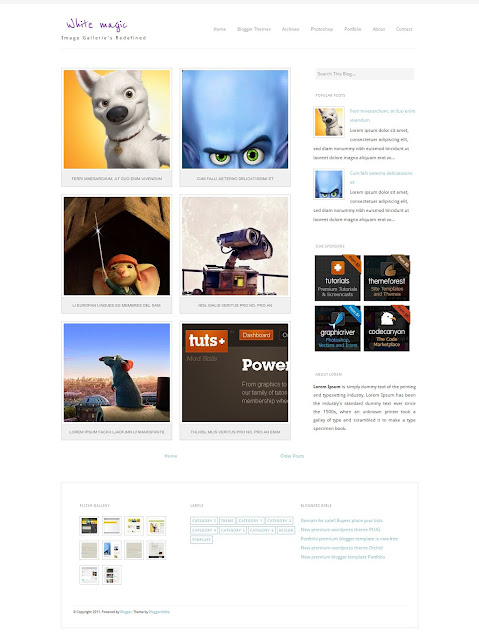

Free blogger gallery template download white magic

White Magic is a minimal gallery template by bloggerzbible.This tempalte has 2 column gallery layout, auto thumbnail and photo widget.

[ Demo ] [ Download ] [ More Info ]

Hamir Putih
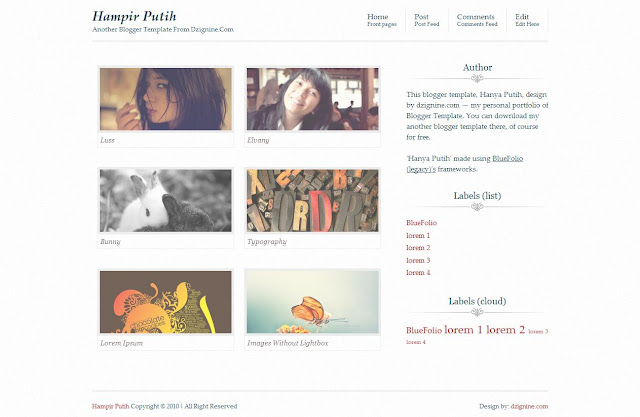

Hamir Putih free blogger gallery template download

Hamir Putih is a simple, minimalistic gallery template by dzignine.This template has beautiful layout and image opacity and jquery lightbox.

[ Demo ] [ Download ] [ More Info ]

Lock Heart
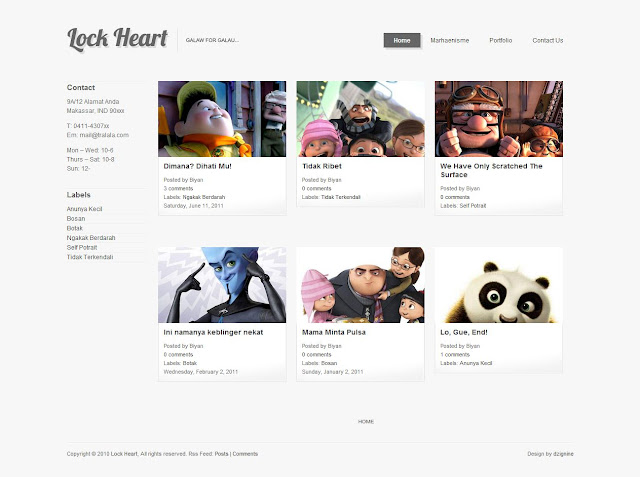

Lock Heart free blogger gallery templates download

Lock Heart is a nice gallery template with 2 column layout, designed by dzignine.This template is good for movie and photo blogs.

[ Demo ] [ Download ] [ More Info ]

Madkassar


Madkasser free blogger gallery template download

Madkasser is a nice gallery theme for blogger by pixel oplosan.It has 4 column gallery layout and is best for photography blogs.

[ Demo ] [ Download ] [ More Info ]

Glamour


Glamour Neue blooger gallery template download free

Galmour Neue is a dark theme gallery template by dzignine.It features include post slider, 3 colun gallery layout and beautiful top menu.

[ Demo ] [ Download ] [ More Info ]

HD iPhone Wallpapers


Iphone wallpaper free blogger gallery template download

HD iPhone wallpapers is a beautiful blogger gallery template by coolbthemes.This template is most suited for mobile wallpaper blogs.It also a beautiful slider pagination.

[ Demo ] [ Download ] [ More Info ]


How was our top 20 free blogger gallery template collection? Did you like them? Let us know in the comments....

Sunday, 14 October 2012

Facebook Share Count Buttons For Blogger

Facebook Share Count Buttons For Blogger

Facebook has now officially introduced the Retweet like Facebook buttons for your blogs or sites. These Facebook buttons look much similar to the Retweet buttons by Tweetmeme. Facebook has 5 styles of Sharing buttons. Here we will see two of them.
Adding a Facebook share count button will show a neat count of how many times your blog post has been shared on Facebook.
Note: The Facebook share buttons are deprecated and FB no longer supports it(It still works though). You can still add it if you want. You can also opt to add the new Facebook Like Buttons with Like Count.

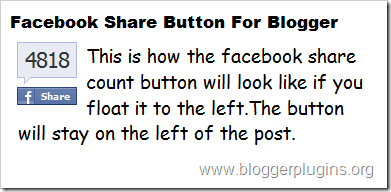
Facebook Share Button Style 1

facebook-share-button-for-blogger-1

Code for Facebook Share Button Style 1

<div style="float:right;padding:4px;">
<b:if cond='data:post.isFirstPost'>
<script>(function(d){
var js, id = 'facebook-jssdk'; if (d.getElementById(id)) {return;}
js = d.createElement('script'); js.id = id; js.async = true;
js.src = "//connect.facebook.net/en_US/all.js#xfbml=1";
d.getElementsByTagName('head')[0].appendChild(js);
}(document));</script>
</b:if>
<fb:share-button expr:href='data:post.url' type='box_count'/>
</div>

Facebook Share Button Style 2

facebook-share-button-for-blogger-2

Code for Facebook Share Button Style 2

<div style="float:left;padding:4px;">
<b:if cond='data:post.isFirstPost'>
<script>(function(d){
var js, id = 'facebook-jssdk'; if (d.getElementById(id)) {return;}
js = d.createElement('script'); js.id = id; js.async = true;
js.src = "//connect.facebook.net/en_US/all.js#xfbml=1";
d.getElementsByTagName('head')[0].appendChild(js);
}(document));</script>
</b:if>
<fb:share-button expr:href='data:post.url' type='box_count'/>
</div>

Facebook Share Button Compact Style 1

facebook-share-button-for-blogger-3

Code for Facebook Share Compact Button Style 1

<div style="float:right;padding:4px;">
<b:if cond='data:post.isFirstPost'>
<script>(function(d){
var js, id = 'facebook-jssdk'; if (d.getElementById(id)) {return;}
js = d.createElement('script'); js.id = id; js.async = true;
js.src = "//connect.facebook.net/en_US/all.js#xfbml=1";
d.getElementsByTagName('head')[0].appendChild(js);
}(document));</script>
</b:if>
<fb:share-button expr:href='data:post.url' type='button_count'/>
</div>

Facebook Share Button Compact Style 2

facebook-share-button-for-blogger-4

Code for Facebook Share Compact Button Style 2

<div style="float:left;padding:4px;">
<b:if cond='data:post.isFirstPost'>
<script>(function(d){
var js, id = 'facebook-jssdk'; if (d.getElementById(id)) {return;}
js = d.createElement('script'); js.id = id; js.async = true;
js.src = "//connect.facebook.net/en_US/all.js#xfbml=1";
d.getElementsByTagName('head')[0].appendChild(js);
}(document));</script>
</b:if>
<fb:share expr:href='data:post.url' type='button_count'/>
</div>

How to install Facebook Share Count Button on your Blogger Blog?

1.Select one of the Share Button Styles and copy the Corresponding Code.
2.Now login to your Blogger Dashboard and navigate to Layout Edit Html and check the check box which says “Expand  widget templates”
3.Find this piece of code
<div class='post-header-line-1'/>
and immediately after that place our Facebook share button code(that you copied) If you were unable to find this code in your template,then look for the first occurrence of
<data:post.body/>
and immediately before that paste our Facebook Share button code(that you copied).
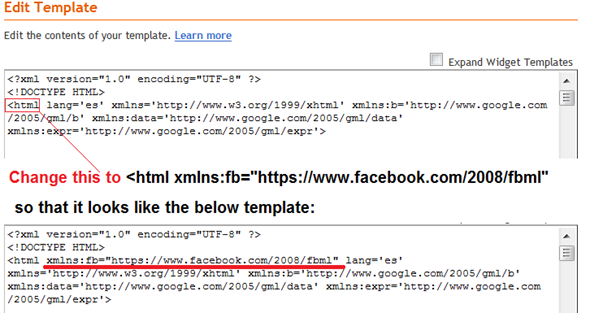
4.Next you have to add the fb namespace to your template tag.Your template should have the specification for the fb tag that you have used. The following namespace declaration will take care of that. To declare the namespace, find
<html
and change it to
<html xmlns:fb="https://www.facebook.com/2008/fbml"
The following screenshot will help you out.
imageThis is necessary for all FBML widgets using the fb tag.  So if you have already added the namespace while adding some other FB plugin, then you can skip this.
5. Save the template and you should get a Facebook share count button near each of your blog post
If you liked this post and if it helped you in implementing the Facebook buttons, then please consider sharing this post on Facebook using the button on the top-right of the post :)

Thursday, 11 October 2012

Most Wanted Best Adsense Tips And Secrets top 20

 Most Wanted Best Adsense Tips And Secrets


AdSense Tip 1: Find Best keywords for your content

Before serving ads on a web page, check its keyword density. You can find many free keyword analyzer tools in internet searching the word "free keyword analyzer".

AdSense Tip 2: Improve your keywords

Get keyword suggestions from Google AdWords Sandbox. Get new keywords that can help you improve your ad relevance.

AdSense Tip 3: Make content rich websites

This means that content-rich websites of a popular topic should attract a large amount of ads.

AdSense Tip 4: Write a new page/blog post every day

This is very important. The more content you have, the more visitors you will get. Put an Adsense unit on each and every content page of your site.

AdSense Tip 5: Choose the right AdSense format

The top three AdSense formats are for many webmasters:
336x280 large rectangle
300x250 medium rectangle
160x600 wide skyscraper
Another successful format is the 728x15 horizontal ad links, that can be placed under your navigation bar.
Use "Allowed site" feature of adsense to protect yourselves.If anyone put adsense codes in their websites you must not worried about it.

AdSense Tip 6: Adsense Color tips

When creating your Google AdSense ads it is recommended to use the color scheme and style of your website so that the ads blend in well.Google Ads with no background color and no borders will always perform better. Make the border color and background color same as your page background color.

AdSense Tip 7: Position tips

For short articles, CTR is best when ads are placed just above the content.
For long articles, CTR will improve if you place ads somewhere in middle of the content or just where the article ends.
Use Text Ads instead of Image Ads as users get more options and the payout is often higher.
Important:Don't places images next to Google ads as that will invite a permanent ban to your AdSense account.

AdSense Tip 8: Increase the number of ads, but not too much

If you have a lot of text on a page, use multiple AdSense units. You can use up to three AdSense units on a page, two AdSense search boxes and one unit of ad links.

AdSense Tip 9: Preview Google ads

You can find out what ads will be served by Google AdSense if you install Google AdSense Preview Tool, a very simple tool available only for Internet Explorer 6.0. Click to advertiser sites without generating invalid clicks, and easily add their URLs to your URL filter list. Because AdSense uses geo-targeting, Google serves different ads for other countries.

AdSense Tip 10: What not to do with adsense

Don't click on your own ads
Don't ask others to click on your Google ads
Don't manually change AdSense code
Don't place Google ads on sites that include prohibited content (e.g.: adult sites)
Don't employ cloaking, hidden text or farm links
Don't use AdSense ads on the same page with similar ads (e.g.: Yahoo Publisher Network)
And also don't refresh your site excessively.

AdSense Tip 11: Use section targeting

Use section targeting to emphasize some content in your page.To know more about section targeting read this article.

AdSense Tip 12: Your Google ads should be visible

Make sure your text ads are visible well to the surfers in all screen formats.

AdSense Tip 13: Use AdSense channels

You can categorize the content of your website into channels and then track your performance. This way you can experiment with different types of ads and see which is performing the best.

AdSense Tip 14: Follow Adsense Programme Polices

Strictly follow the rules mentioned in Adsense policies. You will always earn more monet from Adsense if you do it.

AdSense Tip 15:Never modify the Google Adsense HTML code

If have trouble embedding AdSense code in your Blogger template, read these articles.

AdSense Tip 16: Don't place ads in pop-up windows,error pages,empty pages

You must always remember to not to do it.

AdSense Tip 17: Don't start a "MFA"(made for adsense) web site

You will never make money out these Made for Adsense websites. Instead, write on topics what you are passionate about. Don't waste your money and time searching on high-paying adsense keywords lists.

AdSense Tip 18: Block Low Paying Adsense Ads

Block low paying advertisers with Filters.For more info read this article.

AdSense Tip 19: Adsense For Search

Always select the setting to open Google Adsense search box results in a new browser window, so you won't lose your visitors.

Thursday, 20 September 2012

Earn money online without investment

Are you a blog writer or a web site owner and looking to earn money from your site then this article will help you to earn some revenue. i'll try to explain how to do it from step by step..These days most of the publishers use ad-displaying methods such as google Ad-scence, Ad-brite to earn money but very few people earn beyond 100$ per month,the reson for that is it need very higher trafic rates, noramlly 1000page view per day. It is very difficult to earn such amount of trafic rate to your site if you a blog writer, therefore im going to share with you a very effective method which can generate 100$ day. follwing are my earning records; (I made this amount in one day after setting up my method and letting itrun on autopilot, let me show you how to setup your own money maker.)Before getting down to business...You need to Register for a account as a publisher:click here to proceed(pls give all the information they asked about your site and they also asked for a shot description about how you going to show there ads in your site,in here you have to give a very brief but effective statement. plz read this article before appling to the account. ) This is how it's done: 1. Before you start earning you'll have to get accepted into their network, if you do what I tell you to in the next few steps, you should be accepted into their network within 24 hours. (Less if you already have a content website.) 2: To get accepted by the surveying offering network (SON), you must have a website to submit with your application when you apply. (Continued) 3: SON is important because of the gateway they provide. You can use this gateway to block any sort of content you mayhave on your own website, game content, movie content, etc..(Adult content not allowed) The reason you block the contentis because the visitor has to complete one of the surveys thatpops up on the gateway; once he completes the survey thevisitor gains access to your content, and you get $1 - $5 per survey completed. Imagine having 100 visitors complete a survey a day. 100 visitors is no biggie either, I get way more. 4: Make sure you have a YouTube account handy to be able to upload videos with descriptions linking to your site. (This is where your main traffic will come from.) 5: Now that you have a very basic idea of what will be going on we can start with the step by step process. 6:example I'll be using with this guide will be related to watching movies online for free. You need to create a blogger blog. Its very easy to cerate just visit the www.Blogger.com. Once you crated the glog start making blog entries on new movie releases. Add a poster picture for better clicks. Here's an example of one of my blog posts. You'll have different youtube videos for every post you want to do on your blog. So if you post about the movie 'Knowing', make a youtube video about watching 'knowing' online and have it link to your blog. (More details on this later.) Ok Now you have to do a simple crack to you new blogger blog. Here how to do this. 1.Log in to blogger then go to your dashbord and then select Layout. Ok Now you have to do a simple crack to you new blogger blog. Here how to do this. Click on Edit Html and then paste/type follwing code below the tag. 2. Then go to the SON account(If they approve you) click on tools then create new Advertising zone. Then they will give you a java script code. coy this code and paste it in your blog html page by replacing "your Full java script code here" 3.Thats it now it should be work like a charm. Try to attract new visitors to your blog. Use adsharing methods like Spot(www.spot.com) Once they click on “Watch” it leads them to an html page I have setup that looks like this. This is the gateway that pops up. It doesn't have to be a fake page, you could actually embed the real movie if you feel like you won't get in trouble. SON lets you edit the gateway to the way you want it. So, once they complete a survey, the popup gateway should disappear and they can either enjoy their movie, or have it redirect them to another website. Make sure you have at least 4-6 blog posts before submitting your website to SON with your application. You should get approved in no time. 8: Uploading to YouTube is simple, find a screenshot from the movie you'll be uploading a video about, try to find ascreenshot from an actual scene in the movie and place itnear the center of the video you'll be creating with WindowsMovie Maker so that the youtube thumbnail makes it look like the actual movie when someone is searching. 9: Ok so, your title should be something like the following: WatchOnline Free, part 1/13, full length movie. Doesn't have to be exactly the way I made it, you can change things around, as long as you keep the words online, free, and movie in the title. Then enter you blog post link in the 'more info' While making your video on Windows Movie Maker, state something like you see in the picture above. “Movie was removed due to copyright issues” or something... Be creative, that's thekey.Ok, so you pretty much know how to make money now.Thousands of people are searching everyday on youtube for freemovies online, you don't want to be the one that misses out. Themore videos you make, the more traffic you get. The moretraffic, the more money... of course!This method can be used for other niches, not just movies, I wasjust giving an example. Think outside the box, find something no one else is doing on youtube and get some freakin easy money!

Thursday, 3 February 2011

How to Add Tweet Box to Blogger

 How to Add Tweet Box to Blogger 
It has been a long time since @Twitter released the @AnyWhere Developer Tool. AnyWhere allows you to seamlessly integrate Twitter into your site using a few lines of JavaScript. You can read more about it at  @AnyWhere Developer Page. Tweet Box is one such @AnyWhere Application, which allows you to add a 140 char Tweet Box onto your blog.
Here is a screen shot of how the Tweet box appear on my Previous Post.
image
Hope that now you got a good idea of how this works, If not scroll down to the bottom of the post and see it in live action :)

How to add the Tweet Box on a Blogger Blog?

1. Go to the @AnyWhere Developers Page and create an Application there with your blog details.
image
Make Sure that you have checked the Read & Write Option when you Register your Application
2.When you complete the signup process, you will get some JavaScript codes, with a unique  API Key
Copy out the JavaScript from there(the code in the red box) as shown in this Screenshot.
image
3.Now Login to your Blogger Dashboard and navigate to the Edit HTML Tab under Design and “Expand your Widget Templates
4.Look for
</head>
and paste the copied Twitter JavaScript just above that line and save the template. 5.Now look for
<data:post.body/>
and immediately below that paste the following JavaScript Code and save your template. (Editable parts are shown in red)
<b:if cond='data:blog.pageType == &quot;item&quot;'>
<div id='bp_tweetBox'/>
<script type='text/javascript'>
bp_tweet_link=&quot;<data:post.url/>&quot;;
twttr.anywhere(function (T) {
T(&quot;#bp_tweetBox&quot;).tweetBox({
width: 560,
label: &quot;Share the L&#10084;ve  &amp; Retweet&quot;,
defaultContent: &quot;RT @bloggerplugins <data:post.title/>&quot;+&quot; &quot;+bp_tweet_link
});
});
</script>
</b:if>
Now you should see the Tweet Box on all of your post pages
Currently, this doesn’t do any URL shortening . You can expect that it my next post. I will  also try to post about the other @AnyWhere features soon :)
Share your opinions and if you have any questions about the tweet button, feel free to ask :)


Wednesday, 2 February 2011

अथ श्री एग्रीगेटर कथा

अथ श्री एग्रीगेटर कथा


डिस्क्लेमर: पोस्ट ऐसे ही मौज में लिख दी गयी है, इसलिए सतही है. किसी गंभीर विश्लेषण की उम्मीद न रखें. जरूरी काम निपटाने के बाद ही इधर समय दें :) :)

आजकल हिन्दी ब्लॉगजगत में 'एग्रीगेटर संकट' की बड़ी चर्चा है. हर दो-तीन दिन में किसी न किसी ब्लॉग पर एग्रीगेटर्स की शोक-सभा दिख जाती है. हर कोइ आकर अपने श्रधांजलि अर्पित कर जाता है, कोइ कहता है कि फलां एग्रीगेटर के जाने से जो स्थान रिक्त हो गया है उसे भरना असंभव है, कोइ कहता है हमें उनके बिना काम चलाने की आदत डालनी होगी. फिर कोइ आकर दिवंगत एग्रीगेटर की जगह एक नए एग्रीगेटर के निर्माण का आह्वान करता है, बाकी लोग जोश में आकर जोरदार समर्थन करते हैं. घनघोर हल्ला मचता है. फिर लोग चद्दर तान के सो जाते हैं..

एग्रीगेटर का महत्व हर भाषा के ब्लोग्स में रहा है. इससे लोगों को ताजा सामग्री एक जगह मिलती रहती है. उस दिन की कुछ अच्छी पोस्ट्स भी एक जगह पढने को मिल जाती हैं. अंगरेजी के ब्लोग्स में अगर पाठक तत्काल न आ पाए तो बाद में काम की सूचना को गूगल पर ढूंढता हुआ आ जाता है. और अंगरेजी के पाठक इतने हैं कि ऐसे भूले-भटके पाठकों की संख्या भी ठीक-ठाक होती है. पर एक तो अपनी हिन्दी में कोइ गूगल सर्च नहीं करता, सिवाय हिन्दी के विद्यार्थियों/साहित्य प्रेमियों और खुद ब्लोगरों को और फिर जिन विषयों पर अधिकाँश हिन्दी ब्लोगर लिख रहे हैं शायद ही उनके लिए कोइ गूगल सर्च करेगा. अब जो बहुत पुराने ब्लोगर हैं, जिनका नाम स्थापित है उन तक तो पाठक किसी तरह पंहुच ही जाते हैं. कुछ वास्तव में उनके लेखन को पढने के लिए तो कुछ सिर्फ इसलिए कि उन ब्लोगों पर ज्यादा लोग आते हैं तो शायद वहाँ से कुछ पाठक मुझे भी मिल जाएँ.

नए ब्लोगर्स के लिए समस्या बड़ी गंभीर है. जाहिर है आप कालजयी लेखन न भी कर रहे हों तो भी ये तो इच्छा रहती ही है कि कुछ लोग पढ़ें आपको, कुछ बोलें उसपर. लेकिन लोगों को पता तो चले. अब इसके लिए या तो सबको थोक भाव में ई-मेल (जिसको आप तकनीकी भाषा में स्पैम कह सकते हैं) भेजा जाए या फिर लोगों के ब्लोग्स पर जाके बेमतलब गरिया आयें, वो बदला लेने आएगा ही, या फिर कुछ मीठा ही बोल आयें, शायद गदगद होकर श्रीमान अपने भक्त को देखने आ जाएँ. कई तरीके हैं और मेरे हिसाब से कोइ गलत नहीं है. अभी कुछ दिन पहले एक एग्रीगेटर शोक सभा में ही किन्ही का वक्तव्य पढ़ रहा था कि एग्रीगेटर के टाइम में कई बार नए और फालतू ब्लोगर भी भड़कीला शीर्षक देकर पाठक बटोर लाते थे. सही बात है. पर हमें यह समझना चाहिए कि हिन्दी ब्लोगिंग अभी बचपन के दौर में है, या यों कहें कि डायपर में ही है. अभी काफी दूर जाना है इसे. अभी तो नेट पर हिन्दी में कुछ है ही नहीं. छोटी-छोटी भाषाओं में इससे ज्यादा सामग्री उपलब्ध है. अभी समय है कि कोइ हिन्दी में कैसा भी लिख रहा हो, कैसे भी पाठक बटोर ला रहा हो उसको प्रोत्साहित करने का. वैसे आप कौन से तीर चला रहे थे कम्प्युटर पर बैठ के. बेचारे की पोस्ट पढके कुछ लिख दीजिये. आदरणीय समीर जी और संगीता पुरी जी जैसे कुछ ब्लोगरों का नाम उल्लेखनीय है इस काम के लिए. एक बार हिन्दी में पर्याप्त सामग्री हो जाए नेट पर, लोग सर्च इंजनों के जरिये आने लगें फिर गुणवता के आधार पर छांट कर पढ़िए. फिर एग्रीगेटर बनाने के लिए मनुहार नहीं करनी पड़ेगी. खुद बड़ी कम्पनियां आगे आयेंगी.

कुल मिलाकर एग्रीगेटरों की कमी तो खल रही है. एक दो नए-नए एग्रीगेटर हैं बाज़ार में पर उनमें ब्लोगवाणी वाली बात नहीं दिखती. एक इंडली है- उसमें एक तो हर पोस्ट जाकर मैनुअली फीड करनी पड़ती है और दुसरे उसपर ज्यादा लोग जाते नहीं तो फिलहाल तो ज्यादा उम्मीद करना बेकार ही है उससे. एक दो और हैं जैसे रफ़्तार और हमारीवाणी पर उनका फंडा मुझे आज तक समझ नहीं आया. कभी कोइ पेज नहीं खुलता,  कभी ब्लॉग नहीं जुड़ता और जुड़ जाए तो पोस्ट नहीं दिखती. इधर एक दो नए प्रयास किये गए हैं जैसे हिन्दी ब्लॉग-जगत और ब्लॉग परिवार. ये प्रयास निश्चित रूप से सराहनीय हैं. अगर अलग अलग क्षेत्रो और थीम्स से जुड़े ऐसे-ऐसे कई ब्लॉग बन जाएँ तो एक पूर्ण एग्रीगेटर की कमी को पूरा किया जा सकता है.

बाकी एक लाइन में निष्कर्ष यह है कि बच्चा, पाठकों की संख्या और टिप्पणियों के पीछे मत भागो सामग्री की गुणवता पर ध्यान दो. पाठक झक्क मारकर पीछे आयेंगे. :) अभी नहीं तो २-४ साल बाद. मेरे जैसा चालू टाइप मत लिखो, भाई लोगों के ब्लोग्स से सीखो ;)

ब्लॉगिंग ये रोग बड़ा है जालिम

ब्लॉगिंग: ये रोग बड़ा है जालिम


ये ब्लोगिंग की लत किसी नशे की लत से कम नहीं होती. ये मैं अपने अनुभव से बता रहा हूँ और मेरा अनुमान है कि आपमें से अधिकाँश लोग मेरी बात से सहमत होंगे. इस पोस्ट में ब्लोगिंग के साथ अपने अब तक के अनुभव को आपसे साझा करूँगा.

ये मेरे नए ब्लॉग या कहें कि ब्लोगिंग की इस पारी की पहली पोस्ट है इसलिए शुरुआत ज़रा बैकग्राउंड से करना सही रहेगा. पहली बार 'ब्लॉग' शब्द शायद २००३-०४ के आसपास सुना था. नया नया एनसीआर (गाजियाबाद) आया था. कम्प्यूटर पहली बार वहीं देखा और यूज किया. तब ब्लॉग का मतलब बस यही समझ में आया था कि इससे मुफ्त में वेबसाईट बन जाती है.. और आपको पुरी दुनिया उसपर देख और पढ़ सकती है.. नेट पर अपना नाम देखने का ही अलग चाव था. फोटो देखना सभव नहीं था क्योंकि डिजिटल कैमरे और स्कैनर तक पहुँच नहीं थी उस वक्त. तो एक ब्लॉग बनाया हमने भी. करना क्या है ये नहीं पता था. तो वही किया जो बहुत से नए ब्लोगर शायद आज भी शुरू में करते हैं. हिन्दी साहित्य के एक पोर्टल पर जाकर दो चार कवियों की कविताएँ कॉपी की और अपने ब्लॉग पर चेप दीं (कॉपीराइट किस चिड़िया का नाम है, नहीं पता था). और सीना चौड़ा करके रूम पर आ गए (ये क्रांतिकारी कार्य साइबर कैफे में २० रूपये कुर्बान करके हुआ था). लगा कोइ बड़ा किला फतह कर लिया है. ब्लॉग ट्रैफिक वगैरह तकनीकी  चीजों का पता नहीं था. मुझे तो लग रहा था की लाखों लोग अब मेरे ब्लॉग पर आ रहे होंगे.

उसकी बार जब भी कैफे जाता ब्लॉग को खोलकर देखता और बस मन गदगद हो जाता. फिर २००७ में दिल्ली आया. तब तक वो ब्लॉग तो वहीं का वहीं था.. पर कम्प्युटर के बारे में तकनीकी ज्ञान ठीक-ठाक हो गया था. दुनियादारी की समझ भी थोड़ी बढ़ गयी थी. फिर जे एन यू आया तो एक अच्छा एकेडमिक और वैचारिक वातावरण मिला जिसका प्राइवेट इंस्टीट्यूट्स में अभाव होता है. फिर एक नया ब्लॉग बनाया- नाम रख दिया जेएनयू. कुछ महीने बाद महसूस हुआ की नाम उचित नहीं था. सुनने से जेएनयू का आधिकारिक ब्लॉग मालूम होता था. पर फिर छोड़ दिया लापरवाही में. शुरू में तो ब्लॉग पर काफी जोर-शोर से पोस्टिंग की पर फिर धीरे धीरे आलस बढ़ता गया और साथ में पोस्ट्स के बीच का अंतराल भी. फिर करीब करीब बंद ही हो गया. और भी एक दो ब्लोग्स थे जो ठहर-ठहर के चलते चलते बंद से ही हो गए.

इस साल के शुरू में कोरिया सरकार की स्कोलरशिप के लिए अप्लाई कर दिया; मिल भी गयी. अगस्त, २०१० में  कोरिया आ गया. यहाँ एक तो बात करने वाला कोइ नहीं, सोचने का समय काफी. ब्लोगिंग का कीड़ा फिर कुलबुलाने लगा. सोचा, पैसे हैं अपना डोमेन और वेब होस्टिंग लिया जाए, थोड़ा सीरियसली ब्लोगिंग की जायेगी. कई सारे वेब-होस्टिंग पैकेजेज पर रिसर्च किया. सालाना करीब करीब ५०-६० डॉलर का खर्च था. पर अपने आलसपन पर शक था अभी भी. कहीं एक-दो महीने बाद जोश ठंडा पड़ जाए तो पैसे बेकार.. फिर एक दिन नेट पर भटकते हुए दिल्ली की एक कपनी का विज्ञापन देखा जो मात्र ९० रूपये में .in वाले डोमेन बेच रही थी. हमने फोन लगाया बात हुई और दिल्ली में एक मित्र को बोलकर कंपनी के अकाउंट में पैसे ट्रांसफर करवाए. दो डोमेन खरीदे- www.topikguide.in जो कि कोरिया भाषा क्षमता परीक्षण की तैयारी से सम्बंधित है और दूसरा scsatyarthi.in जिसके एक सब-डोमेन  http://korea.scsatyarthi.in/ पर यह ब्लॉग है. फिलहाल कुछ समय तक गूगल ब्लोगर पर फ्री होस्टिंग की ही सेवा लेने का निर्णय लिया. बाद में मन हुआ तो खुद होस्ट किया जायेगा.

शुरू में बड़ी टेंशन का विषय था कि ब्लॉग हिन्दी में बनाया जाये या अंगरेजी में. लगा अंगरेजी में यह ब्लॉग एक ज्यादा बड़े टारगेट तक पहुँच पायेगा और अधिकाँश इन्टरनेट यूजर्स को अंगरेजी आती ही है. पर फिर लगता यार हिन्दी मातृभाषा है. भले ही कम लोग पढेंगे हिन्दी में पर उनसे जो अपनापन मिलेगा वह अंगरेजी में संभव नहीं. और अंगरेजी में पहले से हर विषय पर पहले से हजार ब्लॉग हैं- कोरिया पर भी; हिन्दी में सामग्री का अभाव है नेट पर....  इस तरह के ढेर सरे तर्क वितर्क.. अंत में हिन्दी की ही जीत हुई.

 आपका स्वागत है इस नए बसेरे पर.. आप थोड़ा उत्साह बढाते रहेंगे तो लिखने का जोश बना रहेगा.. लिखने की शैली बोरिंग है पर झेल लीजिए.. आगे सुधारने की कोशिश करूँगा. खासकर ब्लॉग जगत के पुराने धुरंधरों से विशेष स्नेह और मार्गदर्शन चाहूँगा.. ;)